How to Clean Your Vinyl Siding

Dirt and mildew buildup on vinyl siding can cause it to look dull, but regular cleaning can remove this buildup. Aim to clean your vinyl siding once or twice per year, depending on where you live and how much dirt, dust and grime build up on your home. 

vinyl cleaning

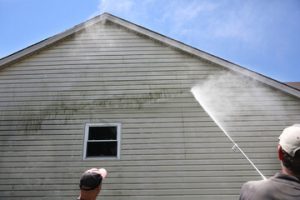
You can use a garden hose and soft-bristled brush or a commercial cleaner designed for vinyl siding. Avoid using metal brushes, which can scratch the surface and strip the color. Also, never use a pressure washer to clean vinyl siding, as high-pressure water can crack or damage the surface. Keep reading the article below to learn more about Vinyl Siding Cleaner.

Generally, soapy water and a soft-bristled brush should be enough to remove most dirt from vinyl siding. But for stubborn stains, a mixture of three parts distilled white vinegar and seven parts water should do the trick. This solution is safe for the environment, won’t harm surrounding vegetation and will effectively clean mildew and mold stains from vinyl. You can find this solution online or at most hardware stores.

If you notice mildew stains, scrub the affected areas with this solution in a circular motion. Then rinse the siding with a garden hose with a sprayer attachment. Always remember to wear gloves, safety goggles and a respirator as recommended for the specific cleaning products you choose.

Once your vinyl siding is clean, you can paint it with a low-VOC, semi-gloss exterior house paint that matches its original color. Be sure to paint in a well-ventilated area and on a day when outdoor temperatures are moderate and humidity is low. Also, do not paint over mildew stains, as these can trap moisture behind the paint and lead to rot and mildew in the future.

To maintain your vinyl siding, be sure to keep landscaping trimmed so plants and trees don’t brush up against the house. This prevents scratches, stains and helps air circulate around the house. You should also regularly inspect your vinyl siding for any cracks or loose panels, and promptly address any problems, so they don’t worsen. Doing these simple things can help ensure that your vinyl siding will last a long time and look beautiful in the process.

Prevents Dirt and Mildew

Vinyl siding is a classic exterior covering that’s visually appealing and durable, but it does require regular cleaning to remove dirt, mildew, and other debris. Dirt buildup dulls the surface, and it’s also a breeding ground for mold and other microbes that can damage your vinyl siding and cause stains. Regular cleanings help prevent these problems, and they’re a great way to boost your home’s curb appeal.

Using a garden hose with a sprayer attachment is a quick, effective way to clean most of the dirt on your vinyl siding. For tougher stains, mix a solution of water and a gentle cleaner or mild soap in a bucket and apply with a soft-bristled brush. Make sure to wear rubber gloves to protect your hands, and scrub the surface with a circular motion to work the soap into the dirt. Rinse the solution off with a garden hose to avoid streaks, and repeat as needed until your siding is clean.

To help prevent mildew from forming on your vinyl siding, keep the area surrounding your house free of shrubs, plants, and other items that may rub against the surface. Trim bushes and trees regularly to prevent overgrowth that can rub against your vinyl siding, and consider using a soft-bristled brush with a wide brush head for difficult-to-reach areas. Avoid using harsh chemical cleaners on vinyl siding because they can damage it. A better option is a gentle cleaner that’s safe for vinyl, such as a homemade mixture of white vinegar and water.

Scrubbing your vinyl siding may seem like the fastest and most effective way to clean it, but this method can scratch the surface, which will dull the appearance over time. A more effective and safer approach is to use a soft-bristled brush and mild cleaning solutions, such as distilled white vinegar or oxygen bleach, that are safe for vinyl.

For more severe stains or other serious issues, you may need to hire a professional to perform a thorough deep clean of your vinyl siding. A professional can use specialized cleaning equipment and techniques to remove even the most stubborn dirt, mildew, and other debris without damaging your vinyl siding.

Prevents Mold and Mildew

Vinyl siding is a popular choice for homes in many areas of the country due to its durability and low maintenance. However, dirt, mold, and mildew can build up on vinyl siding over time, affecting its beauty and deteriorating its structure. Regular cleaning of vinyl siding with the proper cleaner can help prevent mildew and mold and keep it looking new.

Mildew and mold can cause a variety of problems for homeowners, including a loss in curb appeal, damage to the structural integrity of the house, and respiratory distress in those who are sensitive. The most effective way to remove mildew and mold from vinyl siding is to clean the surface on a regular basis with a mild cleaning solution. A diluted bleach solution or store-bought vinyl siding cleaner can be used to achieve the best results. Using a soft-bristle brush or sponge is a great way to scrub hard-to-reach spots on the vinyl siding, and making sure to rinse thoroughly with the garden hose or pressure washer afterward can help prevent streaking and leave the vinyl siding in excellent condition.

The frequency with which you should perform your vinyl siding cleaning routine will depend on the environmental conditions in your area and around your home. For instance, if your house is near trees or other vegetation, pollen, sap, and organic debris will build up on the siding more frequently. Your local climate also plays a role, as humidity and moisture can contribute to the growth of mildew. In addition, it is recommended that you regularly trim trees and shrubs to reduce shading of your house and promote airflow, which can also inhibit mildew development.

It is important to wear protective equipment such as rubber gloves, goggles, and a respirator when using more potent cleaning solutions. A mask or respirator is also a good idea when working from heights, such as when climbing ladders to reach second-story vinyl siding. Also, it is a good idea to wear appropriate footwear to avoid slippage and falling. You will also want to remove any outdoor furniture or decorations from the surface of the vinyl siding, and you should cover any plants or flowers near the area with a tarp to protect them from the cleaning solutions.

Prevents Stains

Keeping your vinyl siding clean not only enhances curb appeal, it also protects your investment and prolongs its lifespan. Regular cleaning can prevent deterioration due to mold, mildew, and other unsightly stains. Experts recommend washing your vinyl siding at least once a year and more frequently in humid areas or near trees or shrubs that shed leaves, branches, or other debris.

The best vinyl siding cleaners are biodegradable, non-toxic, and free of harsh chemicals that can damage your home or the surrounding environment. They should be safe to use with garden hose attachments or pressure washers, and they should work well with your specific cleaning tools. Some cleaners can tackle a variety of problems, such as general dirt or oil, while others specialize in mold or mildew removal. Some are even formulated to prevent discoloration and protect against future growth.

Vinegar is a simple DIY cleaner that can remove mildew and other light stains from vinyl siding. It is made by combining 30% white vinegar with 70% water and may be diluted with other ingredients such as laundry detergent or dish soap to make a more robust cleaning solution. Commercially available cleaning products are also formulated to safely clean and protect vinyl siding and often include mold inhibitors to keep your vinyl looking new for longer.

To use a cleaning solution, start by rinsing the siding with a garden hose to loosen any dirt or debris. Next, apply the cleaner to a soft brush or sponge and scrub away the grime in small sections. Begin at the bottom and work your way up to avoid streaking. After scrubbing, rinse the area thoroughly with a garden hose or pressure washer set to a low setting. Be sure to rinse around any flowers, plants, or shrubs to prevent splashing or soaking.

Seamless Layers: The Evolving Craft of Modern Siding Installation

Durability starts from the surface of every structure. Hardie Siding Installation Montana has transformed from a basic exterior task to a highly technical process blending art and engineering. The goal is no longer just weatherproofing, but achieving seamless harmony between design, energy efficiency, and sustainability. This shift redefines how buildings breathe and endure over time.

Siding

New materials now drive the evolution of siding installation. Composite panels, engineered laminates, and adaptive polymers allow precision fitting without distortion. Each layer reacts intelligently to temperature changes, reducing expansion stress. This adaptability ensures longer-lasting finishes and consistent visual appeal.

The concept of thermal resistance has become central to siding innovation. Installers now integrate insulation layers beneath the panels for improved energy retention. This dual-layer system stabilizes interior temperature, cutting reliance on mechanical cooling. It blends function with environmental mindfulness.

Moisture control has taken a scientific turn in siding techniques. Micro-ventilated gaps are engineered to channel water vapor outward while blocking rain intrusion. These unseen air pathways prevent rot and mold formation. They make exteriors more resilient in fluctuating climates.

Precision alignment tools have redefined accuracy in installation. Laser guides and digital leveling instruments ensure every panel meets exact tolerances. This eliminates visual inconsistencies across large walls. The outcome is a uniform texture that enhances architectural flow.

Aesthetic layering is now an architectural signature. Designers mix horizontal and vertical siding orientations for visual rhythm. Installers must match each transition point seamlessly. The result is a balanced surface that shifts subtly with changing light.

Siding installation today demands understanding of thermal expansion physics. Each material expands differently when exposed to sunlight. Installers now leave calculated micro-gaps to allow safe movement without cracks. The science of space preservation keeps façades pristine.

Acoustic performance has become an unexpected advantage. New siding assemblies integrate sound-dampening substrates. They absorb vibrations and reduce exterior noise infiltration. This innovation creates quieter and more peaceful interior spaces.

Advanced adhesives are replacing traditional fasteners in some applications. These bonding systems distribute load evenly and prevent surface perforations. The method enhances structural strength while maintaining sleek aesthetics. Installation becomes faster, cleaner, and more sustainable.

Color stability is another evolving priority in siding technology. UV-resistant coatings now prevent fading even under prolonged exposure. These coatings also add hydrophobic protection against moisture staining. The vibrant look remains intact through years of environmental wear.

Smart sidings now integrate embedded sensors. These microchips track surface temperature, humidity, and movement over time. The data allows predictive maintenance and early detection of stress zones. Building envelopes are now digitally aware of their own condition.

Siding installation has also embraced modular thinking. Pre-sized panels reduce onsite cutting and material waste. Installers assemble façades like precision puzzles with interlocking precision. It saves time and ensures consistent quality from one project to another.

The environmental narrative continues with recyclable siding materials. Manufacturers develop panels that can be reprocessed at the end of their lifecycle. Installers follow labeling systems to ensure proper disassembly. Sustainability extends beyond installation—it’s a full-circle process.

Thermal imaging assists in installation verification. After the panels are placed, inspectors use infrared devices to detect heat leaks. This technology ensures airtightness and insulation uniformity. Every joint becomes part of a monitored ecosystem.

Curved architecture challenges traditional siding methods. Installers now use flexible composites that bend without breaking. These materials contour around modern structures effortlessly. It opens creative freedom for architects while maintaining installation integrity.

Siding integration with smart homes is growing fast. Panels now connect to energy management systems to regulate external temperature absorption. This intelligent coordination minimizes heat gain during hot seasons. It’s where construction meets digital climate control.

Weather-adaptive coatings mark another innovation wave. These surface layers self-adjust their reflective properties depending on sunlight intensity. Installers apply them as a finishing touch that works invisibly. They extend the lifespan of the siding while improving comfort indoors.

Robotic installation tools are entering large-scale projects. Automated machines handle heavy panels with surgical precision. They reduce human error and accelerate project timelines. The installer’s role shifts toward supervision and calibration.

Airflow optimization under siding systems has become an advanced study. Installers now calculate ventilation pressure zones for continuous air movement. Proper airflow reduces condensation risks and preserves insulation efficiency. The building stays dry, stable, and breathable.

Micro-textured surfaces create subtle aerodynamic benefits. These engineered finishes resist dust accumulation and improve water shedding. Installers treat every panel like a piece of functional sculpture. The outcome is both self-cleaning and visually sophisticated.

Fire resistance has advanced through mineral-based composites. Installers integrate these non-combustible layers in critical areas for safety compliance. The panels withstand high heat without structural compromise. It ensures protection without sacrificing aesthetics.

Precision-cutting technology now defines installation speed. Computer-guided saws and digital templates eliminate guesswork. Every edge fits with minimal waste and perfect alignment. It turns craftsmanship into a measured science.

Environmental sealing compounds are evolving too. Modern sealants expand microscopically within gaps for tighter closure. Installers apply them using temperature-sensitive applicators for better adhesion. The result is a flawless weatherproof seal across all surfaces.

Drone inspection assists in quality assurance after installation. These aerial devices capture high-resolution images of façades. They reveal imperfections that might be invisible from ground level. This modern practice ensures no corner remains unchecked.

Texture simulation has transformed design expectations. Siding can now mimic stone, wood, or metal with uncanny realism. Installers align each piece carefully to preserve illusion continuity. It allows creative expression without the burden of natural material cost.

Structural bonding between siding and substrate uses nanotechnology. Microscopic adhesion particles create stronger, longer-lasting contact. It enhances resistance to vibration, temperature shifts, and wind force. The invisible connection defines new structural standards.

Moisture barriers have become multi-layered membranes. Installers sandwich these between framing and panels to regulate vapor flow. They are breathable yet waterproof, ensuring balance. It’s an unseen but vital protection line in modern siding systems.

Ergonomic advancements in installation tools reduce fatigue. Lightweight power devices and adjustable scaffolding improve efficiency. Installers complete more work with better precision and less strain. It elevates both safety and craftsmanship.

Reflective pigments in siding coatings now interact with solar radiation. They redirect heat energy away from building surfaces. Installers apply these materials strategically to enhance passive cooling. It lowers operational energy demand in the long run.

Augmented reality aids pre-installation visualization. Technicians project siding patterns on walls before attaching panels. It ensures visual symmetry and client satisfaction prior to physical work. Precision begins in the planning stage, not just the installation.

Joint sealing innovation prevents future water intrusion. Self-expanding tapes and intelligent gaskets adapt to pressure changes. Installers use these for complex joints and irregular edges. It ensures reliability under all environmental conditions.

Siding installation has begun merging with living architecture. Panels support moss or microgreen growth for natural insulation. Installers design irrigation systems that keep these façades thriving. The result is eco-active walls that blend life with design.

Acoustic layering in modern sidings enhances privacy. Installers add micro-foam barriers that block outside noise. The panels remain light yet acoustically dense. This innovation reshapes comfort standards in urban environments.

Material recyclability has become a contractual requirement. Clients now demand full disclosure of siding composition. Installers document each product’s sustainability rating. Transparency builds confidence and drives environmental accountability.

Multi-tone gradient designs have redefined exterior aesthetics. Installers carefully align color transitions to match natural light behavior. This visual blending gives depth and sophistication to flat surfaces. Every wall becomes a dynamic canvas that changes throughout the day.

Precision corner fabrication eliminates weak points. Installers pre-bend edges for smoother transitions around structural joints. It reinforces stability and prevents wind-driven separation. Corners now complement the overall siding rhythm instead of breaking it.

Seam invisibility represents the pinnacle of siding installation mastery. Through micro-lock technology, joints vanish under optical illusion. Installers execute perfect alignment that hides every connection. The building appears wrapped in a single continuous skin.

Thermal expansion testing during installation prevents distortion. Installers monitor material behavior under heat stress in real time. They adjust anchoring systems to accommodate micro-movements. This foresight guarantees long-term façade stability.

The combination of mechanical precision and artistic intuition defines the new era of siding installation. Every layer, joint, and texture serves both beauty and endurance. As materials grow smarter and tools more refined, siding transforms from a simple cover to a living surface. It stands as proof that innovation and craftsmanship can coexist within every seamless layer.

Professional Contractor Solutions for Residential and Commercial Projects

Whether it’s building a dream home, renovating a retail space, or managing large-scale office construction, professional contractor solutions play a critical role in bringing projects to life. Residential and commercial developments require expertise, precision, and proper planning to ensure the outcome meets both functional and aesthetic needs. Professional contractors provide a wide range of services that streamline the building process, minimize risks, and deliver high-quality results on time and within budget.

From project planning and design to construction and finishing, professional contractor solutions are tailored to meet the unique requirements of both homeowners and businesses. By leveraging their skills, resources, and industry knowledge, contractors ensure that every project—whether small-scale or large-scale—is executed with efficiency and professionalism.

contractor

The Importance of Professional Contractors

Construction projects are often complex and involve multiple tasks such as design, material procurement, compliance with regulations, and workforce management. Attempting to manage these without professional help can result in costly delays, safety risks, and subpar outcomes.

Professional contractors bring:

  • Expertise in construction techniques, materials, and safety protocols.
  • Project management skills to coordinate schedules, subcontractors, and workflows.
  • Compliance knowledge to ensure adherence to local codes and regulations.
  • Resource access to reliable suppliers, skilled labor, and modern equipment.

Their ability to handle every aspect of construction enables clients to focus on their personal or business goals while leaving the technicalities to experts.

Contractor Solutions for Residential Projects

For homeowners, professional contractor solutions transform ideas into comfortable, functional, and beautiful living spaces. Residential projects often require a personalized approach, as each homeowner has unique preferences, budgets, and timelines.

1. New Home Construction

Building a new home requires careful planning, from the foundation to the final finishes. Contractors provide end-to-end services, including design consultations, material selection, and structural construction. They ensure that homes are built to last, meeting safety standards while reflecting the homeowner’s style.

2. Home Renovations and Remodeling

Whether it’s modernizing a kitchen, expanding living space, or upgrading bathrooms, remodeling projects enhance both the comfort and value of a home. Contractors manage demolition, redesign, and installation while minimizing disruptions to daily life.

3. Additions and Extensions

Expanding a property with additional rooms, decks, or outdoor spaces can greatly improve functionality. Contractors ensure that additions blend seamlessly with the existing structure while providing the extra space families need.

4. Maintenance and Repairs

Professional contractors also handle essential maintenance, such as roofing repairs, flooring upgrades, or structural reinforcements, ensuring homes remain safe and functional for years.

With professional contractor solutions, residential projects are completed efficiently, with high-quality workmanship and attention to detail.

Contractor Solutions for Commercial Projects

Commercial construction and renovations present unique challenges compared to residential projects. Businesses require spaces that are not only functional but also aligned with their brand image and customer expectations. Professional contractors bring specialized expertise to handle these demands.

1. Office Buildings and Workspaces

From designing layouts that maximize productivity to constructing collaborative workspaces, contractors create professional environments tailored to business needs. They focus on durability, functionality, and compliance with workplace safety regulations.

2. Retail and Hospitality Spaces

Retail outlets, restaurants, and hospitality venues rely on appealing designs that attract customers. Contractors work closely with businesses to deliver visually appealing and practical layouts that enhance customer experience.

3. Industrial and Warehouse Facilities

Commercial contractors also manage the construction of large-scale facilities such as warehouses, factories, and distribution centers. These projects require precision engineering, efficient use of space, and compliance with safety and environmental standards.

4. Renovations and Upgrades

As businesses grow, renovations may be needed to modernize interiors, upgrade systems, or repurpose existing spaces. Contractors ensure upgrades are completed with minimal disruption to operations.

By offering scalable solutions, professional contractors support businesses in achieving their long-term goals while ensuring projects are delivered on time and within scope.

Key Benefits of Professional Contractor Solutions

1. Time Efficiency

Contractors coordinate tasks and manage schedules to ensure timely completion, saving clients from unnecessary delays.

2. Cost Management

Through industry connections and resource management, contractors can source quality materials at competitive rates and minimize costly errors.

3. Quality Assurance

Professional contractors uphold high standards of workmanship, ensuring durability and compliance with building codes.

4. Risk Reduction

With their expertise in safety regulations and project management, contractors reduce risks associated with accidents, non-compliance, or structural issues.

5. Customized Solutions

Each project is unique, and contractors provide tailored solutions that align with client needs, whether residential or commercial.

Embracing Modern Contractor Practices

The construction industry continues to evolve, and professional contractors adapt by incorporating modern practices that enhance efficiency and sustainability.

  • Green Building Solutions: Many contractors now use eco-friendly materials and energy-efficient systems to promote sustainability.
  • Smart Technology Integration: Contractors incorporate modern technologies, such as automated lighting, security systems, and smart appliances, in both residential and commercial projects.
  • Innovative Design Trends: Contractors stay updated with design trends, offering clients modern aesthetics combined with practical functionality.
  • Digital Project Management: The use of digital tools for scheduling, progress tracking, and client communication ensures greater transparency and smoother workflows.

By embracing these innovations, contractors provide solutions that meet the evolving needs of today’s homeowners and businesses.

Choosing the Right Contractor

Selecting the right contractor is crucial for the success of any project. When evaluating options, clients should consider:

  • Experience and track record with similar projects.
  • Certifications and licensing to ensure compliance with local regulations.
  • Transparent pricing and contracts to avoid hidden costs.
  • Strong communication skills for smooth collaboration.
  • Client testimonials and references as proof of reliability and quality.

A trusted contractor becomes a valuable partner, ensuring that projects are executed with professionalism from start to finish.

Professional contractor solutions provide the foundation for successful residential and commercial projects. Whether it’s building a family home, renovating a retail space, or constructing large-scale facilities, contractors bring the expertise, resources, and management skills needed to achieve high-quality results.

By offering customized services, ensuring compliance, and embracing modern practices, professional contractors help clients save time, reduce risks, and maximize value. In a world where construction demands are constantly evolving, partnering with skilled contractors ensures that every project—big or small—meets expectations and stands the test of time.

Cleaning Tips For Painted and Stained Refinished Cabinets

Cabinet Refinishing San Jose CA

Cabinets are the most heavily used surface in any kitchen. Showplace cabinetry is designed and crafted to stand up well to normal daily use with simple common-sense care.

The classic solution of mild dish soap and water will work to clean most daily build up. Be sure to rinse and dry thoroughly! Visit Cabinet Refinishing San Jose CA for more details.

Dust Regularly

Dusting is a crucial part of keeping refinished cabinets clean, and should be done often. Regular dusting helps prevent build-up that can damage the finish, and will help your refinished cabinets keep their gorgeous look for years to come.

A soft cloth dipped in a mild cleaning solution is the best way to wipe down painted cabinets without damaging the paint or stain. Use a microfiber cloth, and be sure to get into any tight corners or grooves where dirt tends to gather. The mild cleaning solution will remove food splatters, grease spots, and sticky residues, and will leave cabinet surfaces shining and dry.

When a stubborn stain or build-up can’t be removed with a damp cloth, make a paste of baking soda and water, and apply to the area. Let the paste sit for a few minutes to allow it to work its magic, and then scrub the area with a soft sponge or an old toothbrush, being careful not to scratch the paint. The baking soda will be mildly abrasive, and should help lift the stain and residue with minimal effort. After scrubbing, gently wipe away any remaining paste and residue with a damp cloth.

Do not soak the cabinet surface, as this can cause water to seep into the wood and damage the finish or paint. Also, do not hang wet cloths or towels over the cabinets to dry, as this can cause moisture damage and leave stains or marks on the wood or paint.

If you have a very large area of abused cabinet door (usually caused by a handle or a child’s hand) that has become stained, or the finish has a deep scratch, try lightly buffing it with a bit of clear wax from Annie Sloan. This will soften the top micro layer of existing wax, and will help lift any serious dirt or stains. After applying the wax, be sure to buff well – especially around the handles and edges of the cabinet door. If the abused area is really dirty, you may need to re-wax the entire door.

Clean Spills Immediately

When stains or food splatters are allowed to set, they can become permanent, requiring a complete repainting and more costly repairs. This is why it is important to wipe down cabinets immediately after a mess or spill occurs.

Wipe down cabinet doors and drawer fronts on a regular basis with warm water and a mild soap. This keeps the surfaces clean, but does not allow for long exposure to moisture (which wood hates). Use a soft, lint-free cloth. Microfiber works best. Avoid using packaged dusting sheets or aerosol products intended for general cleaning, as they can scratch the finish and leave sticky residues.

Oil and grease stains are particularly troublesome for painted cabinets, as they are often very hard to remove without serious damage. Mild dish soap can be used to dissolve grease buildup, but it is important to use a non-abrasive cleaner. A gentle kitchen cleanser works well, as do a few drops of liquid laundry detergent mixed into warm water.

If these natural solutions do not work, a solvent-based cleanser may be needed. A few drops of mineral spirits or acetone can help lift stubborn stains, but they also compromise the finish and give off hazardous fumes. Before attempting this, always test the cleanser in an inconspicuous spot.

A small amount of kitchen wax can be used to buff out scratches, gouges, or dings from abused cabinet doors. However, wax should not be used on a regular basis as it attracts dirt and dust. This is why it is important to regularly clean the cabinets with a good cleaner.

Clean Grease and Food Particles Regularly

As a kitchen cabinet painting contractor, I see lots of damaged cabinets that could have been prevented with regular cleaning and proper care. Most of the damage comes from slamming doors and drawers, which can chip paint and leave marks. The other issue is spills, stains, and food particles, particularly on painted cabinets. The best way to prevent these is to clean up messes and spills as they happen, and to wipe down surfaces frequently.

To avoid chipping and scuffing, always use a soft cloth or sponge that is lint-free. This will ensure that you don’t transfer any dirt to other areas of the surface, which can then get scratched or stained by harder objects. If you have to use a hard-scratching scrubbing brush or magic eraser, always apply the cleaner with a damp cloth first, then rinse the area with clean water and dry it completely before scrubbing.

Stubborn grease buildup and stains on painted cabinets can be difficult to remove, but it’s important to take proactive steps to minimize their formation. For example, a strong range hood or extractor fan can help minimize the spread of airborne grease particles to surrounding surfaces. Also, employing splatter screens and lids can keep splatters contained and lessen the impact on the paint and wood finishes.

If you notice a grease or oily stain on a cabinet door or drawer, try using a solution of mild dish soap and warm water, or a pH-balanced wood cleaner. If you’re using a wood cleaner, follow the product’s instructions for application. Finally, to protect the finish and add a little extra shine, you can use a furniture polish or wax designed for cabinetry (just make sure it doesn’t contain any silicone).

If you have an older kitchen with painted cabinets that are showing signs of wear and tear, call Kitchen Tune-Up today to discuss your options for freshening up your space! We specialize in custom cabinet painting and refinishing, and we can help you achieve the look you want with minimal time and effort. Contact us for a free consultation!

Clean Stubborn Stains Regularly

Painting cabinets is an affordable way to reveal dramatic kitchen transformations, but they require special care in order to stand up to daily wear and tear. Regular cleanings using the right methods and products will keep them looking good and durable for years to come.

The right cleaners for painted cabinets are mild, non-toxic, and non-abrasive. Avoid scouring pads, steel wool, powdered cleaners and ammonia-based cleaners, as these can damage the finish or leave scuff marks. Instead, use a mild dishwashing soap and water, a damp cloth, or a non-abrasive sponge.

Wood cabinets should be wiped down regularly with a soft, lint-free cloth. This helps prevent dust and dirt from building up, and keeps moisture to a minimum. Regular wipe downs also help spot staining as it occurs, making it easier to remove.

Light stains can be cleaned with water, but heavier stains may need to be removed with a solvent-based product. If possible, use a degreaser cleaner (such as TSP) diluted with water to avoid damaging the finish. Avoid using abrasive cleansers, including Mr. Clean Magic Erasers, which can scratch the finish. Using a sponge with a scrubber side can also scratch the paint surface and remove its sheen, so use a soft cloth instead.

Stains that are not cleaned properly can be permanent. If the stain has not been stripped and sanded to remove all of the existing finish, it can close the wood grain excessively, preventing new pigments from penetrating and creating an even appearance. It is best to work in small sections of the cabinet, and only sand the area where a new stain needs to be applied.

Dyes can be mixed with water, but they do not penetrate the wood as deep as stains. If you notice a stain that is not absorbing, it might be due to the colorant being too dark for the grain. Mixing a lighter shade of dye could solve the issue, or adding a clear wax coating could make it more even.

Unfiltered sunlight can bleach the color of wood, and if it is absorbed by the finish, it will discolor the stain. It is best to use filtered lighting in the kitchen, or to install window treatments and blinds to reduce UV exposure.

Navigation